gpt api로 웹사이트 만들기 – 백엔드
이 사이트에 들어가 Spring WEB 및 Lombok을 Maven 프로젝트 및 종속성에 추가합니다.
프로젝트 열기
일단 열면 세 개의 팩을 만드십시오.
1.구성
2. 컨트롤러
3. 서비스

먼저 구성을 설정합니다.
파일 이름에 따라 WebConfig.java를 만들었습니다.
웹 구성.자바
import org.springframework.context.annotation.Configuration;
import org.springframework.web.servlet.config.annotation.CorsRegistry;
import org.springframework.web.servlet.config.annotation.WebMvcConfigurer;

@Configuration
public class WebConfig implements WebMvcConfigurer {

    @Override
    public void addCorsMappings(CorsRegistry registry) {
        registry.addMapping("/**")
                .allowedOrigins("http://localhost:3000")
                .allowedMethods("GET", "POST", "PUT", "DELETE", "HEAD", "OPTIONS")
                .allowCredentials(true);
    }
}
이 설정은 react-spring-boot와 나중에 작동하는 동안 포트 번호가 다르기 때문에 CORS 오류가 발생합니다.
AllowedOrigins 부분에서 CORS에 대해 localhost:3000이 허용되는 것을 볼 수 있습니다.
CORS에 대한 설명은 다음과 같습니다.
CORS(Cross-Origin 리소스 공유)
웹 브라우저에서 실행 중인 응용 프로그램이 다른 도메인의 리소스에 액세스할 수 있도록 하는 보안 메커니즘입니다.
현재 사용 중인 브라우저마다 다르지만 일반적으로 javascript에서 다른 도메인에서 api를 호출하는 것은 보안상의 이유로 차단됩니다.
그러나 CORS가 허용되면 API를 호스팅하는 서버가 요청을 허용하고 다른 도메인 리소스에 대한 액세스를 허용하도록 설정됩니다.
이제 백엔드 부분에 컨트롤러를 만듭니다.
GptController.java
import com.example.chatbotbackend.service.GptService;
import org.springframework.beans.factory.annotation.Autowired;
import org.springframework.web.bind.annotation.*;

@RestController
@CrossOrigin
public class GptController {
    private final GptService gptService;

    @Autowired
    public GptController(GptService gptService) {
        this.gptService = gptService;
    }

    @PostMapping("/ask")
    public String ask(@RequestBody String prompt) {
        return gptService.ask(prompt);
    }
}
웹 페이지에서 볼 수 있듯이 이제 전면에서 쿼리 요청을 보내고 보낸 요청에 대한 응답도 반환됩니다.
다음은 서비스입니다.
GptService.java
import com.example.chatbotbackend.OpenAIApi;
import org.springframework.stereotype.Service;

@Service
public class GptService {
    private final OpenAIApi openAIApi;

    public GptService() {
        this.openAIApi = new OpenAIApi();
    }

    public String ask(String prompt) {
        return openAIApi.ask(prompt);
    }
}
이제 단계는 컨트롤러에서 서비스로 보낸 것을 받는 것입니다.
여기에서는 OpenAIApi라는 클래스를 만들고 이를 (도우미 개념으로) 사용합니다.
OpenAIApi.java
import java.net.URI;
import java.net.http.HttpClient;
import java.net.http.HttpRequest;
import java.net.http.HttpResponse;
import org.json.JSONObject;

public class OpenAIApi {
    private static final String API_KEY = "발급받은 api키";

    public String ask(String prompt) {
        String responseBody = "";
        String formattedPrompt = String.format("다음 질문에 대답해 주세요 또한 답변은 한국어로 해주세요: %s", prompt);

        JSONObject jsonBody = new JSONObject();
        jsonBody.put("prompt", formattedPrompt);
        jsonBody.put("max_tokens", 50);
        jsonBody.put("n", 1);
        jsonBody.put("temperature", 0.7);

        try {
            HttpClient client = HttpClient.newHttpClient();
            HttpRequest request = HttpRequest.newBuilder()
                    .uri(URI.create("https://api.openai.com/v1/engines/text-davinci-002/completions"))
                    .header("Content-Type", "application/json")
                    .header("Authorization", "Bearer " + API_KEY)
                    .POST(HttpRequest.BodyPublishers.ofString(jsonBody.toString()))
                    .build();
            HttpResponse<String> response = client.send(request, HttpResponse.BodyHandlers.ofString());
            responseBody = extractAnswer(response.body());
        } catch (Exception e) {
            e.printStackTrace();
        }

        return responseBody;
    }

    private String extractAnswer(String responseJson) {
        JSONObject jsonObject = new JSONObject(responseJson);

        if (jsonObject.has("choices")) {
            return jsonObject.getJSONArray("choices")
                    .getJSONObject(0)
                    .getString("text")
                    .trim();
        } else {
            System.err.println("Error in API response: " + responseJson);
            return "API 호출 중 오류가 발생했습니다.";
        }
    }
}
여기서 중요한 것은 openAI 사이트에서 키를 받는 것입니다.
OpenAI API
OpenAI에서 개발한 새로운 AI 모델에 액세스하기 위한 API
platform.openai.com
홈페이지 방문 시,
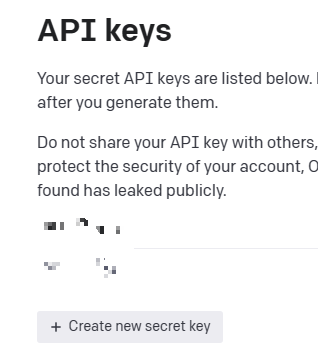
API Keys 탭에서 Create a new secret key를 얻을 수 있습니다.
물론 로그인 후 사용하셔야 합니다.
열쇠를 받으면 분실하지 않도록 잘 보관하십시오.
그러면 백엔드 구성이 완료됩니다.
프로젝트를 이끈다
이제 React를 구성할 차례입니다.
먼저 React가 설치되어 있다고 가정해 보겠습니다.
반응 프로젝트 만들기
npx create-react-app gpt-chat-app
cd gpt-chat-app
npm start
gpt-chat-app 이라고 이름을 지었지만 자유롭게 사용하시면 됩니다.
완료되면 다음과 같이 App.js를 수정하여 프런트엔드를 변경합니다.
app.js
import React from "react";
import "./App.css";
import ChatWindow from "./components/ChatWindow";

function App() {
  return (
    <div className="App">
      <ChatWindow />
    </div>
  );
}

export default App;
다음으로 App.css를 수정합니다.
App.css
.App {
  display: flex;
  justify-content: center;
  align-items: center;
  height: 100vh;
  background-color: #f5f5f5;
}

.chat-window {
  display: flex;
  flex-direction: column;
  justify-content: space-between;
  height: 80vh;
  width: 60%;
  max-width: 800px;
  background-color: #fff;
  border-radius: 10px;
  box-shadow: 0 2px 8px rgba(0, 0, 0, 0.1);
  padding: 16px;
}

.chat-messages {
  display: flex;
  flex-direction: column;
  flex: 1;
  overflow-y: auto;
  padding: 8px;
}

.chat-message {
  margin-bottom: 8px;
}

.user-message {
  align-self: flex-end;
  background-color: #d2ebff;
  border-radius: 10px;
  padding: 8px;
  max-width: 60%;
}

.bot-message {
  align-self: flex-start;
  background-color: #f1f1f1;
  border-radius: 10px;
  padding: 8px;
  max-width: 60%;
}

.chat-input {
  display: flex;
  width: 100%;
  margin-top: 16px;
}

.chat-input input {
  flex: 1;
  padding: 8px;
  border: 1px solid #ccc;
  border-radius: 5px;
  outline: none;
}

.chat-input button {
  background-color: #007bff;
  color: white;
  border: none;
  border-radius: 5px;
  padding: 8px 16px;
  margin-left: 8px;
  cursor: pointer;
  transition: background-color 0.2s;
}

.chat-input button:hover {
  background-color: #0056b3;
}

.clearfix::after {
  content: "";
  display: table;
  clear: both;
}
다음으로 src 폴더 안에 구성 요소 폴더를 만듭니다.
3개의 js 파일을 만듭니다.
1. ChatInput.js
2. ChatMessage.js
3. ChatWindow.js
ChatInput.js
import React, { useState } from "react";

const ChatInput = ({ onSubmit }) => {
  const (inputValue, setInputValue) = useState("");

  const handleSubmit = (event) => {
    event.preventDefault();
    onSubmit(inputValue);
    setInputValue("");
  };

  return (
    <form onSubmit={handleSubmit} className="chat-input">
      <input
        type="text"
        value={inputValue}
        onChange={(event) => setInputValue(event.target.value)}
        placeholder="Type your message..."
      />
      <button type="submit">Send</button>
    </form>
  );
};

export default ChatInput;
이 부분은 입력한 텍스트를 보내는 역할을 합니다.
ChatMessage.js
import React from "react";

const ChatMessage = ({ message, isUser }) => {
  const messageStyle = {
    marginBottom: isUser ? "16px" : "0",
  };

  return (
    <div
      className={`chat-message ${isUser ? "user-message" : "bot-message"}`}
      style={messageStyle}
    >
      <p>{message}</p>
    </div>
  );
};

export default ChatMessage;
이 부분은 메시지를 입력하고 답장을 받을 때 표시되는 스타일 및 div 설정을 보여줍니다.
가장 중요한 것은
ChatWindow.js
import React, { useState } from "react";
import axios from "axios";
import ChatMessage from "./ChatMessage";
import ChatInput from "./ChatInput";

const ChatWindow = () => {
  const (messages, setMessages) = useState(());

  const addMessage = (message, isUser) => {
    setMessages((prevMessages) => (...prevMessages, { text: message, isUser }));
  };

  const handleSubmit = async (message) => {
    // 사용자 메시지를 추가합니다.
    addMessage(message, true);

    try {
      // 백엔드 서버와 통신하여 GPT의 응답을 받습니다.
      const response = await axios.post("http://localhost:8080/ask", {
        prompt: message,
      });

      // GPT로부터 받은 응답을 채팅창에 추가합니다.
      if (response.data) {
        addMessage(response.data, false);
      }
    } catch (error) {
      console.error("Error fetching GPT response:", error);
    }
  };

  return (
    <div className="chat-window">
      <div className="chat-messages">
        {messages.map((message, index) => (
          <ChatMessage
            key={index}
            message={message.text}
            isUser={message.isUser}
          />
        ))}
      </div>

      <ChatInput onSubmit={handleSubmit} />
    </div>
  );
};

export default ChatWindow;
설정이 완료되었습니다.
Spring Boot 애플리케이션을 실행합니다.
터미널 또는 사용 중인 ide 터미널에 npm start를 입력하여 프런트엔드를 실행하면 됩니다.
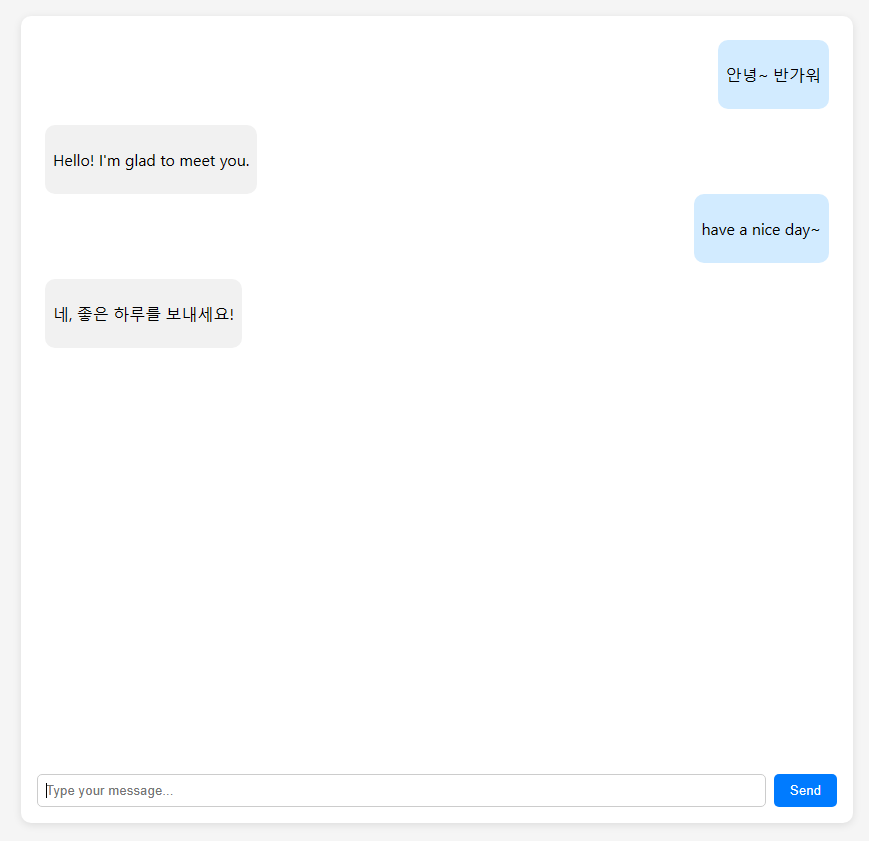
웹 페이지에 localhost:3000을 입력하면 React로 구현한 페이지가 나타납니다.
아직은 백엔드 부분에서 제대로 답변을 받고 처리해야 해서 학습이 덜 된건지 백엔드 기능을 좀 더 작업해야 하는건지 모르겠지만 아주 간단한 답변은 잘 됩니다.
개구리 소녀…
이로써 Chat GPT API를 사용하는 React-Springboot로 GPT 웹사이트 구현이 완료됩니다.